
When I first began making knives, I scoured the internet looking for resources on all aspects of knife making. One thing I noticed was knife makers were anodizing their titanium liners and such with some of the most beautifully brilliant colors. I’m thinking, that’s what I would like to do. I proceed to gather information on what I will need to get as far as supplies so I can do this too! I buy a Variac off eBay, get a few parts from Radio Shack, buy some containers for the electrolytes etc, etc, etc. I put everything together and start my journey into anodizing.
What am I doing wrong!!!!!!! I can’t achieve the colors I want and everything looks like crap! More experimentation, more muddled colors………….What next. Time to dig in a bit deeper. After further investigation, experimentation, and countless discussions with some of the top knife makers, I found out I had the right idea………but the wrong supplies. Below is some of the information I have gathered from several resources which will help you achieve the anodized colors you are looking for.
Variable AC or DC Power
supply.
You will need a power
supply that will allow you to adjust the voltage
similar to the way a light dimmer switch works. To anodize titanium, you need
DC.
If you purchase a Variable AC
Drive (variac) you will need to
convert the AC to DC for anodizing.
What you will need is:
Bridge Rectifier 250C 5 AMP
Some wire
Alligator Clip
Mini Grabber
The rectifier will have 4 leads. The two that are marked with a ~ should be connected to the AC leads from your variac. Connect using barrel connectors or solder if you can. Connect another wire from the + lead on the rectifier to the anode (the Mini Grabber that holds the titanium) . Connect the – lead on the rectifier to the cathode (the end submersed in your electrolyte. More on anodes and cathodes below……..
Variable DC Power Supply
This one is ready to go as is.
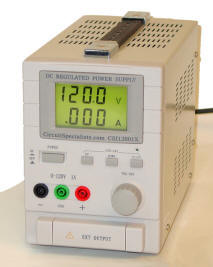
https://www.reactivemetals.com/anodizers-accessories
The proper anode and cathode
The anode:
The anode can be made from titanium or a clip can be purchased from Reactive Metals. I tried making several anodes out of titanium and was never unhappy with the results. I ended up purchasing one from Reactive Metals and it works perfectly. The anode clips that they sell are made with a niobium tip and are called a “Mini Grabber”
https://www.reactivemetals.com/anodizers-accessories
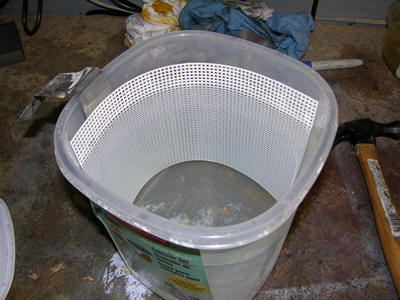
The cathode:
Once again, I tried many
different ways to create a cathode and I found the best way is to use a piece
of Stainless Steel Heat Treating Foil. I cut the foil in such a way as to leave
a small strip on the top so it will hang out of the container. To this strip I
can attach the alligator clip that is connected to the – side of the rectifier.
You will notice in the photo below that the cathode is behind a plastic mesh
screen. This is because you DO NOT want
the cathode and anode to come into contact with each other. This plastic mesh
can be found at many Fabric and Craft stores for about 89 cents.
Electrolyte
Many people use 3 TBSP of TSP per gallon of water and some say Coca Cola works as well. Been there, done that. What I use is sulfuric acid. Go down to your nearest plumbing supply store and buy a quart of the house brand of Industrial Drain Cleaner. You guessed it, the drain cleaner is mostly sulfuric acid with a few inert ingredients. Very carefully, using rubber gloves, dilute 2 tablespoons into a gallon of water. This I have found is the best solution for anodizing titanium. You will have enough to last a lifetime and unclog a few nasty drains as well.
Electrolyte Containers
Nothing high tech here. A trip to the local Target or Walmart will produce a beautiful set of Rubbermaid Canisters. I use the large size for the Electrolyte and the smaller size for the Titanium etch.
Neutralizer
Very simply, dissolve a few
teaspoons of household baking soda into
a gallon of water. This will neutralize the effect of both the Pre-Etch and the
Electrolyte
Pre Etching the Titanium
Prior to pre-etching my titanium, the resulting colors were sometimes unpredictable. I would wash with detergents, soaps, degreasers etc. but none seem to do a great job. When anodizing, the parts to be anodized must be perfectly clean and free from all oils, dust, dirt, grease, etc.
Prior to anodizing, all Titanium parts are etched in a solution purchased from Reactive Metals called Multi-Etch. I don’t know what’s in this stuff but I would never again do any anodizing without it. Well worth the expense. https://www.reactivemetals.com/patinas-chemicals
The Anodizing Process
Now that you have all the materials you need, it time to have some fun. Let’s color up some titanium!
Step 1:
Apply your favorite finish to the titanium parts you wish to anodize. You can polish, bead blast, jewel or just use a hand rubbed finish.
Step 2:
Wash your parts in a good dish washing detergent to remove any dirt, grime, grease etc.
Step 3:
Place your parts on the Niobium Mini Grabber and submerse into the Multi-Etch for 15 to 30 seconds. Time to put on your rubber gloves.
Step 4:
Remove from the etch and immediately submerse into a container of baking soda and distilled water to neutralize the etch.
Step 5:
Remove the parts from the neutralizer and immediately submerse into the electrolyte of sulfuric acid and water. (All power off at this time)
Step 6:
Turn on the power supply and slowly apply voltage to obtain the desired colors.
Step7:
Once color is achieved, shut off the power, remove the part from the
electrolyte and submerse into the neutralizer.
Step 8:
Pat the part(s) dry with a soft towel and sit back and go WOW!!
Experiment trying different
things such as creating a rainbow effect.
Completely submerse your part in the electrolyte and as you start to turn up
the voltage, simultaneously lift out the part. The varying voltages will
produce a rainbow of colors on the part.