The following filework can be completed using these files which can be obtained from MSC
Nicholson 6-1/4“ Swiss pattern files.
Marking file- #0 cut # 60304318 (course) no longer available from MSC
In place of the marking file, you can use a half round and grind the teeth off the flat side
You can find them here: http://shorinternational.com/fileshalfrd.htm
#2 cut # 60304326 (medium)
#4 cut # 60304334 (fine)
#6 cut # 60304342 (very fine)
Round file- #0 cut #60304425
#2 cut #60304433
#4 cut #60304441
#6 cut #60304458
Three square- #0 cut #60304698
#2 cut #60304706
#4 cut #60304714
#6 cut #60304722
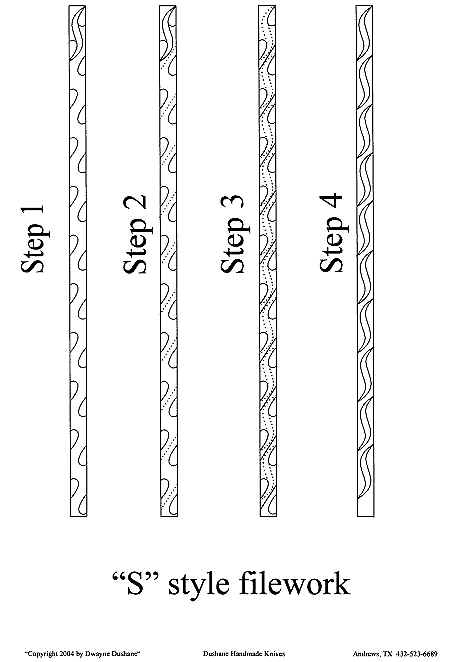
First mark off your work on one side just like you do on the vine type filework. On this pattern I’ve drawn it using 3/16” thick material, so the measurement between the first cut is 9/16”.
Step 1. Cut your all of your marks on one side of your blade or spring. Stop (Pay Attention) I have messed up so many times right here. Your first cuts on this are the same cuts as on vine type filework but on vine type your first cuts all go the same direction. On this pattern one side your cuts go one direction and go the opposite direction on the other side. Look at the drawing, your cuts are centered with each other, but this might play tricks with your eyes. If you don’t cut these in the right place it will throw all of your work off and it won’t look right. Remember everything has to be consistent.
Step 2. Now take your marking file or your three square file, whichever you’re more comfortable with and cut your marks as on the drawing. It’s a straight cut across the top, this one is on a 45 degree angle but isn’t on the compound 45 like before yet, refer to the drawing. Again (Pay attention) You can really get messed up here if you put the cut in between the wrong lobes. And if you’re selling this piece for good money you don’t want to mess it up. And remember to stay consistent with your cuts as they go down the side of your work. It’s possible for the filework to look nice on the top of the spine and still look like crap on the side of the blade.
Step 3. Start with your course marking file and start removing the unwanted material imagining the dotted lines as on the drawing. Remember from start to finish, as you remove the unwanted material you’re going to start cutting from a compound 45 degree angle up & over the top. Be careful and always look at what your doing on the side, keeping the depth of the cut the same as the lobe you cut.
Step 4. Now just keep doing what you’re doing and graduate from the courser files to the finer files. There is alot of room for your interpretation here. As you do this and play with filework, you will find that even though you learned a little about it here at this school, you will end up transforming it to your own way and even though it doesn’t look exactly like someone’s you’ve seen, you’ll be pleased and so will your customers.
One thing to remember about filework is that it’s up to you what it looks like and every time you do it, it doesn’t have to look the same. Some times you might want the vine to be tight and busy looking. Other times you might want it to be stretched out, long and flowing. It’s the same way on your rope pattern & S pattern. Play with it on different pieces, even if it’s on some scrap brass.